Numismatic Photography Archives
A question came up recently on an Australian Coin Forum about how best to capture the colour of toned bronze coins. It's an interesting question so we decided to investigate four different methods of photographing the same coin in an effort to faithfully reproduce the toning. On our photo setup the end of the lens is 35cm away from the coin. The closest together we can get our two lights is 6cm from the centreline of the lens. So we tested this case, and two others with the lights 12cm and 18cm off of the lens centreline. As a final case we also tested putting the lights back to their normal 6cm position and tilted the coin toward the lens to reflect the light from the coin surface back into the lens directly.
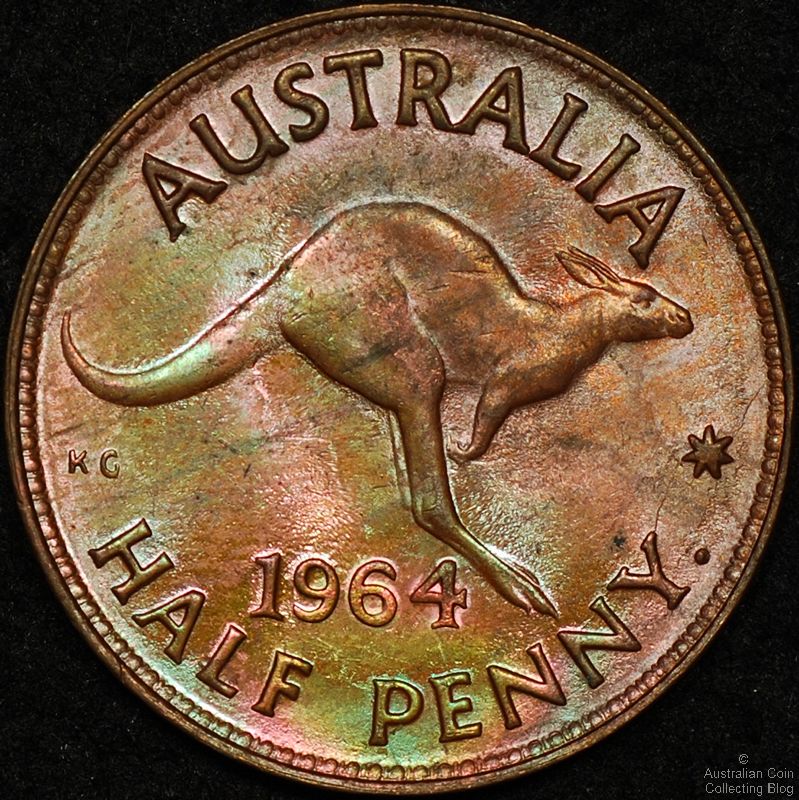
Case 1 - Lights 6cm off of centreline
This corresponds to a light angle of about 10 degrees off of ideal normal angle. We know it's counter-intuitive but for the best lighting and images you want the camera and lights some distance away from the coins so that the angles are minimised. Camera Settings f10 1/250s. Here's the image at this angle:
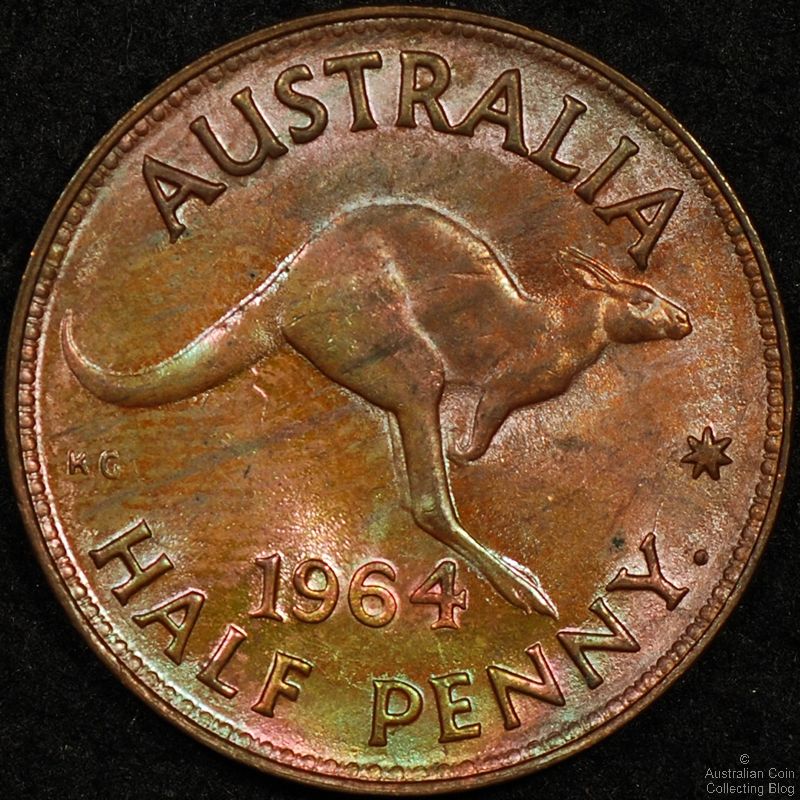
Case 2 - Lights 12cm off of centreline
This corresponds to a light angle of 19 degrees. Camera settings f10 1/200s.
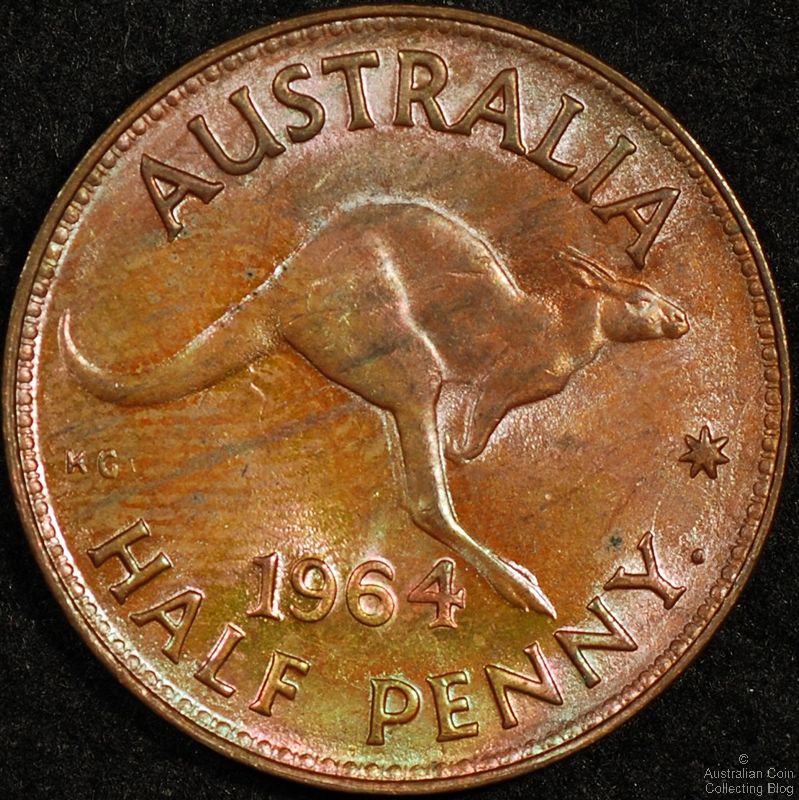
Case 3 - Lights 18cm off of centreline
This corresponds to a light angle of 27 degrees. Camera settings f10, 1/160s.
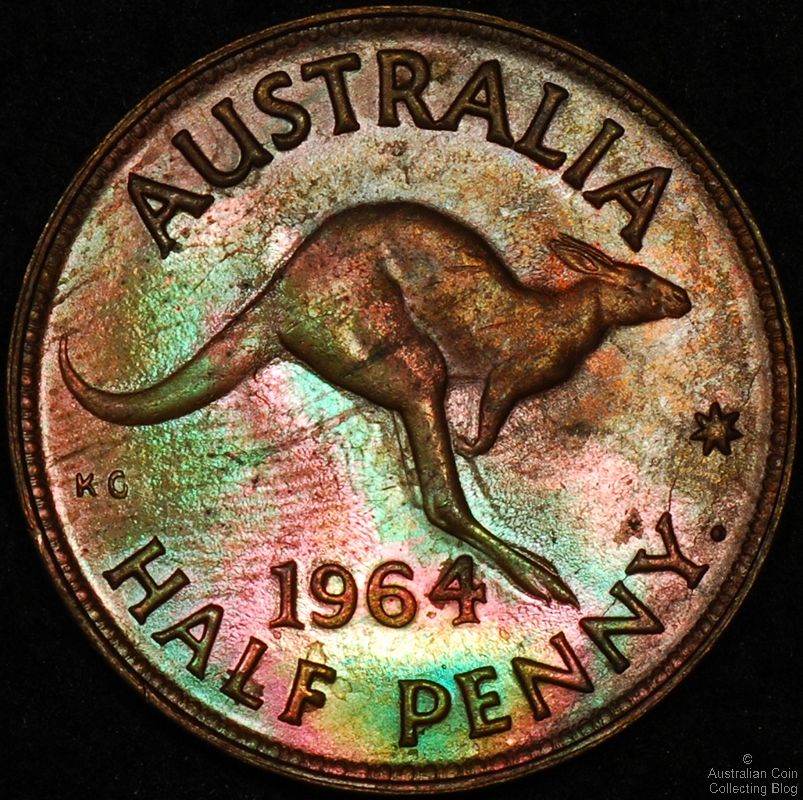
Case 4 - Lights 6cm off of centreline, tilted coin
This case illustrates one real advantage of having the camera and lights a long distance away from the coin. When you till the coin you don't actually need to tilt it very much (only 10 degrees in this case). So the coin appears largely round. It still requires adjustment of the f stop of the camera to keep the whole coin in focus though. Camera settings f16, 1/320s.
Conclusion
To see as much colour as possible the light onto a coin should ideally be reflected directly into the lens of the camera. This means either getting the lights as close to normal to the plane of the coin as possible or tilting the coin to reflect the light. Clearly tilting the coin is not ideal because of the inevitable distortion of the shape of the coin, and the larger focal plane required of the camera (and corresponding increase in exposure time).
When the light is reflected directly into the lens of the camera colour is maximised but the effect of any lustre is lost. In our experience any visible cleaning or hair lines can also be concealed using this lighting technique.
The best images are a compromise between the two extremes. We believe that Case 1 has the best images for both indication of coin grade and colour.
Unless otherwise stated the copyright for images used on this site is owned by the Australian Coin Collecting Blog. You are not allowed to use or reproduce them in any form for any reason without our permission. We've spent a lot of time and money learning how to take great coin images and you're just not allowed to take credit for our hard work.
That all sounds scary but getting permission to use our images is usually just a matter of emailing us and asking nicely. In the majority of cases we just like to be credited as the source of the image. If you're using an image online then we need to have a link back to this website.
It's as simple as that. Do not use our images without asking first.
For our previous entry Using Diffused Lighting for Coin Images we discussed using diffuse lighting and how this type of photography is reflected in the quality of the images.
Diffuse lighting is light softened and evenly spread so it does not pour directly onto the coin surface. This transparency can be achieved by the use of a light tent which can take on many forms. A light tent can be a fancy little foldable device (not dissimilar to a beach tent) available from a camera shop or eBay. It could be as simple as baking paper taped to the lamps. In our examples we cut down a 3L milk bottle to place over the coin and directed the light from the sides through the bottle. Whatever you decided to use, it need not be an expensive exercise as we've shown.

Our Light Tent
A recent topic on a coin forum lead me to investigate the use of diffuse lighting when taking some coin images. My experience suggests that diffuse lighting is only useful for imaging coins of a particular type. It tends to produce low contrast images, hide design details and bagmarks, and suppress coin lustre. On the plus side it gives a very even light source which means a consistent light level across the entire surface of the coin. I've found in the past that the best coins to image using diffused lighting are proofs with a cameo contrast between the devices and the fields.
I've taken images of three very different coins so we can examine the effect of using diffused lighting compared with our normal imaging setup.
Coin 1 : Australian 1959 Penny
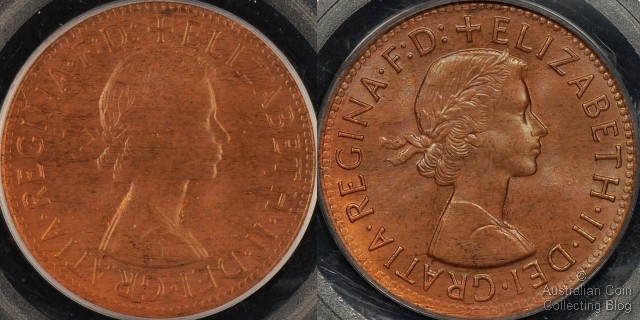
Australia 1959 Penny - diffuse lighting left, normal lighting right
As you'd expect the normal lighting setup produces a far superior image for this sort of red/brown bronze coin with minimal lustre. The lack of lustre means the diffuse light produces virtually no contrast and the design features are largely lost in the background of coin. The normal lighting setup gives a much more realistic image, with the coin lustre apparent and full design detail visible.
Coin 2 : Australian 2010 20c
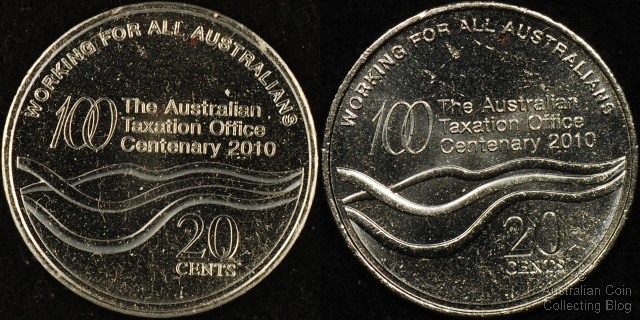
Australia 2010 20c - diffuse lighting left, normal lighting right
Lustrous copper nickel coins with wear like the 20c above are difficult in the extreme to image correctly. The reflectivity combined with the bagging and wear typically makes the coin appear much worse when imaged that it actually is in hand. Seen above neither the diffuse nor normal lighting setup has done a good job of representing this coin. If anything I'd suggest that the diffuse lighting has produced a superior image but it is still a poor image. I've found that a variation of the tilted coin imaging technique I wrote about previously is the best way of imaging these lustrous copper nickel coins so I am not entirely surprised both lighting techniques used here performed poorly.
Coin 3 : Canadian 1971 $1
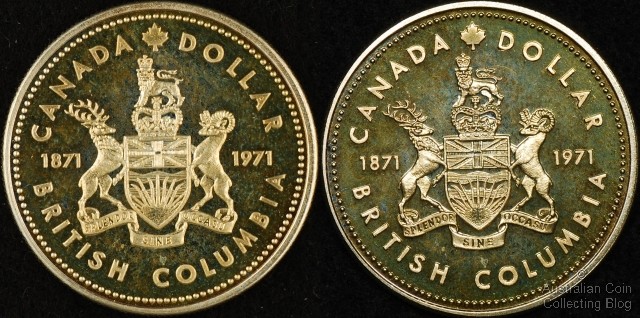
Canada 1971 $1 - diffuse lighting left, normal lighting right
Above you can see a lovely, toned Canadian silver dollar. These coins have typically been stored in the felt lined cases they were issued in and this has lead to all sorts of coloured toning through the mirrored fields and frosted devices. The toning in the fields can often be quite blotchy and the mirror of the fields can wreak havoc on image quality if any direct lighting is used when imaging them. The image taken with the diffuse lights shows excellent cameo contrast and highlights the mirrors of the fields well. The normal lighting setup still shows the frosted effect on the devices, however the contrast with the fields is not as strong and the fields look blotchy and unattractive. The diffused lighting image is a much closer representation of the actual coin in hand.
Conclusions
Diffused lighting can be a useful tool in the coin photographers arsenal. However it is only suited to some types of coins and time must be taken to understand when it should be used. If used incorrectly it can produce unattractive images that do not represent a coin correctly. It can also hide lustre, coin detail, coin damage, wear, and bag marks. As a coin buyer you should learn to recognise images taken with diffuse lighting and be aware the coin may not be exactly as it appears.
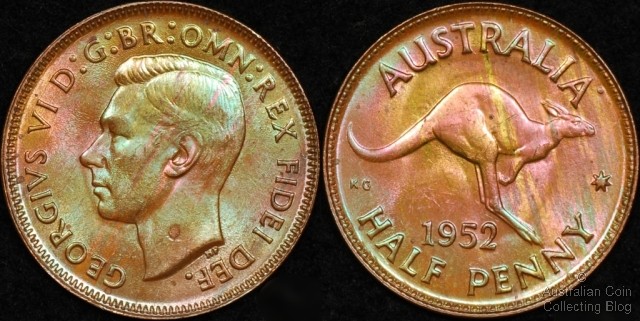
Image 1 : Australia 1952A Half Penny
Above you can see a lovely, glossy, lustrous Australian 1952 Half Penny. It's probably the most wildly toned bronze coin we've seen, and completely natural and typical of Perth minted bronze Australian coins. However, the image above doesn't do much to convey just how deep and wild the colours on this coin are. The image below gives a much better idea.
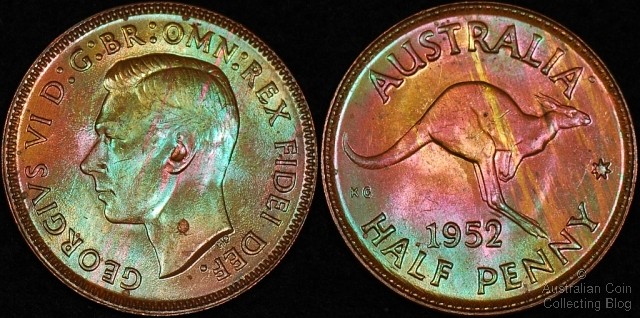
Image 2: Australia 1952A Half Penny
Believe it or not, the differences in setup between these two images were slight indeed. Yet the characteristics of the two images are completely different and the aspects of the coin character they convey are completely different. Firstly let's look at the difference in the actual physical setup used in the two images. This is shown in the (rather poor) image below.
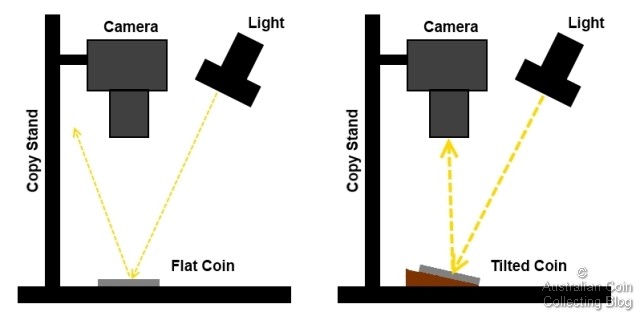
Normal Coin Imaging and Tilted Coin Imaging
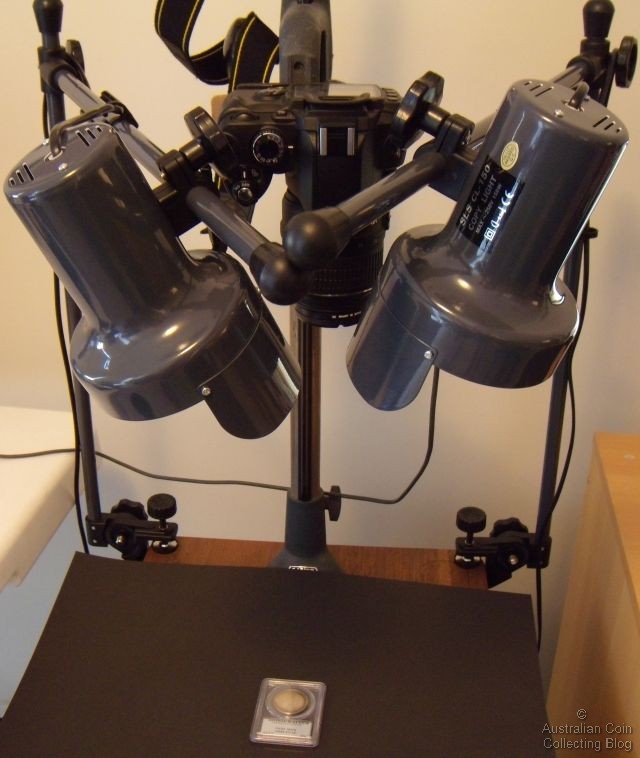
As you can see, the only real visible difference between the setup used to take the two images is that the coin in the second image has been tilted to reflect the light directly into the camera lens. This is different from the normal imaging setup where a more diffused reflected light is picked up by the camera lens. While the differences in setup are small, there are changes required to the camera to enable it to take both images properly. By the way if you wanted to see the actual equipment we use to take our images rather than the cartoonish representation above you should take a a look at this entry on how we take our coin photos.
Horizontal Coin Images require a large amount of light because of the diffused reflection to the camera lens. If you do not have enough light then you'll need a long exposure time and will likely lose some sharpness in your image. So the more light you have the better. Image 1 was taken with the camera at f10 and with a shutter speed of 1/200th of a second.
Tilted Coin Images need to be taken at a high f stop. This is because the coin is tilted and a larger depth of field is required around the focal plane to ensure the whole coin is in focus. The higher f stop allows this. Higher f stops require longer exposures than lower f stops and thus a lot of light is needed again. However this is counteracted by the brightness of the light reflected from the coin and usually exposure times are less for tilted coin images compared with horizontal coin images. Image 2 was taken with the camera at f13 and with a shutter speed of 1/320th of a second. There is one additional aspect to the physical setup that may be required with tilted coin images. Often the very act of reflecting light directly from the coin surface into the barrel of your camera can cause glare across an area of the coin. The remedy to this is to diffuse the light from your light sources using some sort of diffusion screen.
The Characteristics of Horizontal Coin Images vs Tilted Coin Images
| Characteristic | Horizontal Coin | Tilted Coin |
| Light | More | Less |
| f Stop | Lower f Stop | Higher f Stop |
| Exposure Speed | Slower | Faster |
| Coin Lustre | Realistic | Subdued |
| Colour | Subdued | Exaggerated |
| Image Contrast | Subdued | Exaggerated |
| Bag Marks | Subdued | Exaggerated and strongly contrasted |
When to Use the Tilted Coin Technique
In our experience the tilted coin technique can be useful for imaging certain types of coins. We'd suggest that using it on the following types of coins can be an effective method of conveying the true character of a coin:
- Colourfully toned glossy copper or bronze
- Proof coins with mirrored fields, especially those with toned mirrors
- Some toned silver coins, but should be used with caution as it can remove the appearance of lustre
Using the tilted coin technique can be an effective method of showing the true colours of a toned coin right across the surface of the coin. When used in conjunction with what we'd call the 'normal' horizontal image of a coin it can help to convey the true nature of a coin. That being said, it can also produce exaggerated images with wild colours, subdued lustre, and what can appear to be severe bag marking. It should therefore be used with some degree of caution.
Camera Setup
We've spent years striving to perfect the art of taking quality coin images. Over the years we've upgraded parts of our setup and we're finally at that point where we're happy with the images we take and happy that they portray the coins as they are without the need for photoshop or artificial manipulation. We use 2 different methods of coin photography. The first is to use a Dinolite Microscope for extreme closeup shots which we've discussed previously in the entry Dino-Lite USB Microscopes and Coins. We also have a digital SLR for images of entire coins not requiring magnified close-up. The Dinolite won't image an entire coin unless it's threepence size and the built in lighting is very poor for imaging an entire coin.
Our digital SLR is a Nikon D60 with 10.2 megapixel resolution. We mostly use a Tamron 90mm fixed length macro lens for coins but interchange it with one of it's original lenses, a Nikon 18-55mm lens. This lens is used for shots of larger items such as PNC's and mintsets. The camera sits on a copystand we picked up secondhand from a camera shop and is movable up and down. Clipped on either side of the copystand are 2 lights with swivel arms and shrouds to direct the light. Using 2 PAR 30 100w halogen spotlights the serious light is serious enough to fry an egg! We control the camera from a PC running Nikon's nifty Camera Control 2 software. So what it comes down to now is place the coin under the camera and click via the keyboard!
Here at blog central we've been experimenting for years now with camera setup and lighting to try and capture the most out of coins. The copystand holds a digital slr camera and some newly purchased lights with some powerful globes now topping off the setup. My partner will be starting shortly on a series of lighting articles but since he's taken some fantastic images in the last few days I just had to put them up. This series I've titled "a pretty penny".
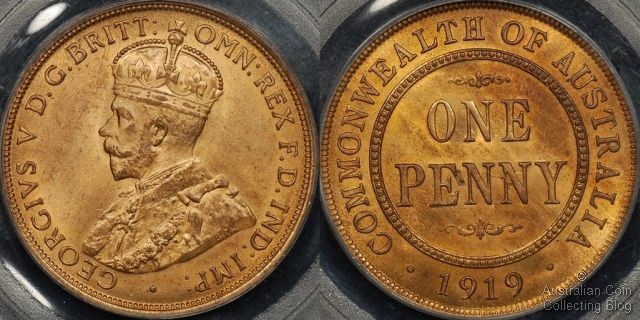
1919 Penny PCGS MS65RB
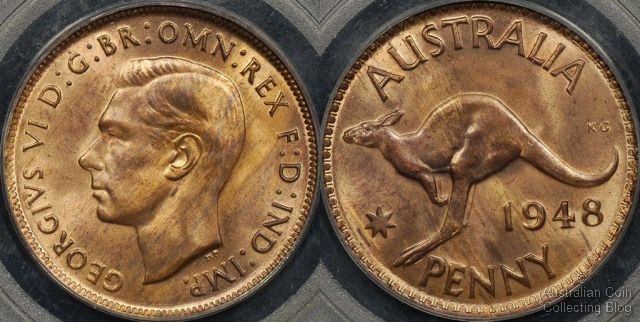
1948 Penny PCGS MS66RB
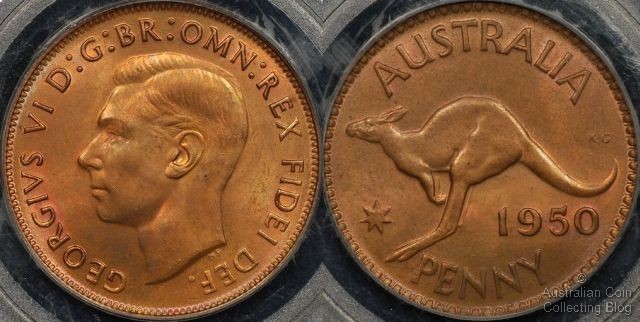
1950 Penny PCGS MS66RB
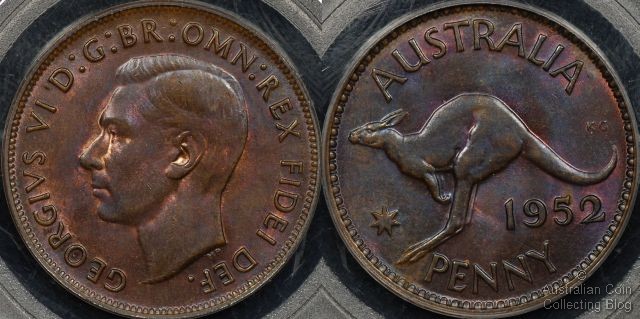
1952 Penny PCGS MS65BN
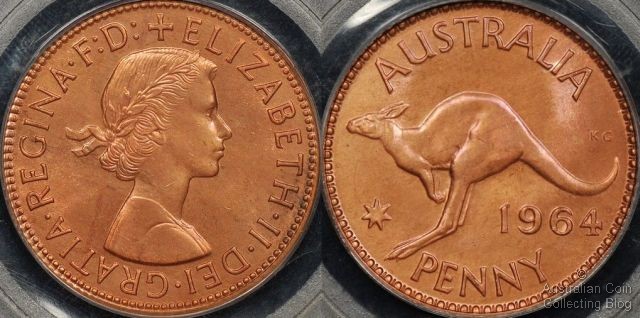
1964m Penny PCGS MS65RD
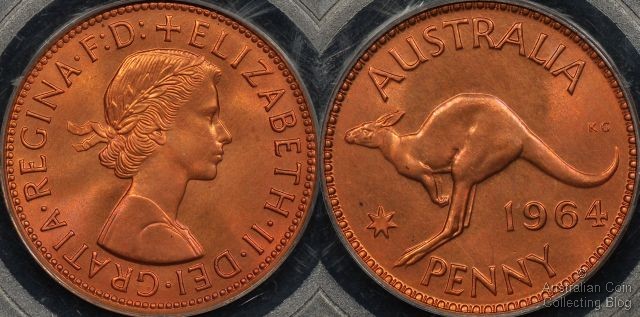
1964m Penny PCGS MS65RB